Troubleshoot HVAC: When the temperature soars, a functioning air conditioning system is crucial for comfort. However, if your air conditioning isn’t cooling, it can be frustrating and uncomfortable. Several factors could be at play when your cooling system fails to perform as expected.

Understanding the potential causes is the first step towards resolving the issue. Common problems include issues with the thermostat, refrigerant leaks, or clogged air filters. In some cases, the problem might be more complex, involving electrical or mechanical faults within the system.
By identifying the root cause, you can take the necessary steps to restore your cooling system’s functionality. This guide will walk you through 7 possible reasons your air conditioning isn’t cooling and provide insights into how to troubleshoot these issues effectively.
Key Takeaways
- Common issues with air conditioning not cooling include thermostat problems and refrigerant leaks.
- Clogged air filters can significantly impact cooling performance.
- Electrical or mechanical faults may require professional diagnosis.
- Regular maintenance can help prevent many cooling issues.
- Troubleshooting steps can help identify the root cause of the problem.
Troubleshoot HVAC: Your HVAC System and How It Works
To effectively diagnose and fix HVAC cooling problems, it’s essential to grasp how the system operates. The HVAC system is a complex network that works to provide a comfortable indoor climate.
Basic Cooling Cycle Explained
The cooling cycle is fundamental to understanding how your HVAC system works. It involves the transfer of heat from inside your home to the outside. This process is facilitated by a refrigerant that circulates through the system, absorbing heat from indoor air and releasing it outdoors.
Key Components and Their Functions
The HVAC system consists of several key components, both indoors and outdoors, that work together to cool your home.
Indoor Components
Indoor components include the evaporator coil, which absorbs heat from the indoor air, and the air handler, which circulates the cooled air throughout your home.
Outdoor Components
Outdoor components include the condenser coil, where the absorbed heat is released, and the compressor, which compresses the refrigerant to facilitate the heat transfer process.
Signs Your HVAC System Is Failing to Cool
Recognizing the signs of HVAC failure is essential for timely repairs. When your HVAC system isn’t cooling correctly, it can lead to discomfort and potentially cause more severe problems if not addressed promptly.
Warm Air Coming From Vents
If you notice warm air coming from the vents, it’s a clear indication that your HVAC system is not functioning as it should. This issue could be due to a variety of reasons, including refrigerant leaks or a malfunctioning compressor.
Inconsistent Temperatures Throughout Home
Inconsistent temperatures throughout your home are another sign that your HVAC system is failing to cool effectively. If some rooms are significantly warmer or cooler than others, it may indicate a problem with air distribution or ductwork.
System Running Constantly Without Cooling
If your HVAC system is running constantly but not cooling your home, it’s a red flag. Continuous operation without achieving the desired temperature could be due to issues like a faulty thermostat or clogged air filters.
Unusual Sounds or Odors
Unusual sounds or odors emanating from your HVAC system are also indicators of potential problems. Grinding noises might suggest mechanical issues, while musty smells could indicate mold growth within the system.
Being aware of these signs can help you identify HVAC issues early, potentially saving you from more costly repairs down the line.
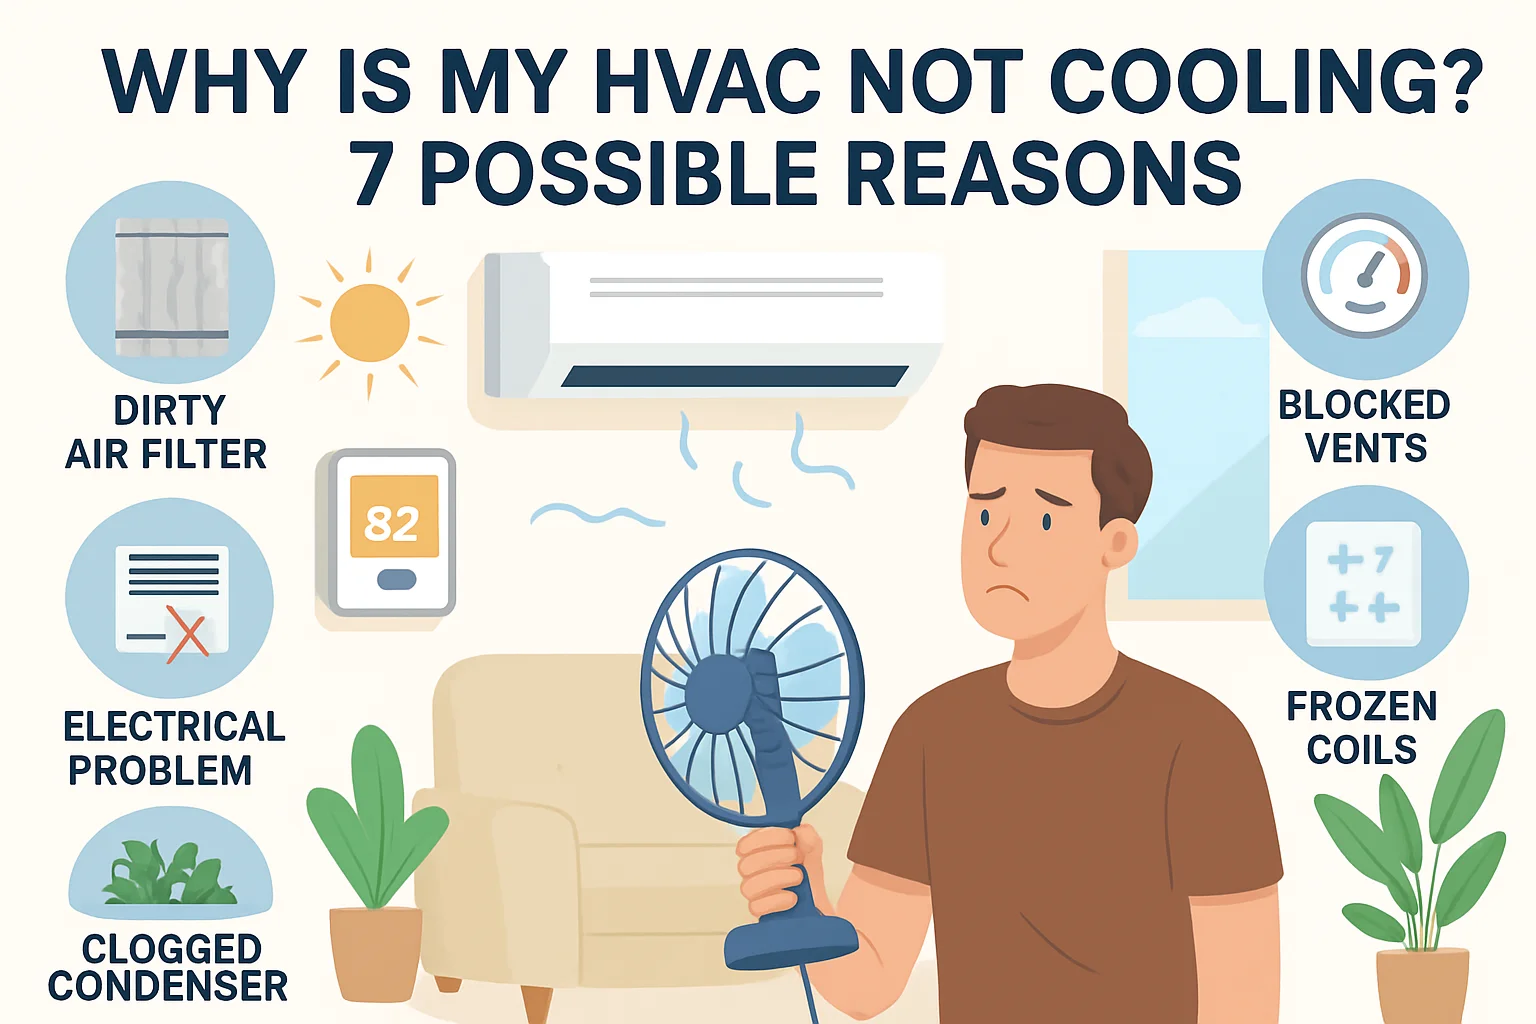
Why Is My HVAC Not Cooling? 7 Possible Reasons
When your HVAC system fails to cool, it’s crucial to identify the root cause. Several factors can contribute to this issue, and understanding these potential problems is key to resolving them.
Overview of Common Cooling Problems
Common issues that prevent HVAC systems from cooling include dirty air filters, refrigerant leaks, thermostat malfunctions, dirty condenser units, frozen evaporator coils, electrical problems, and ductwork issues. Each of these problems can significantly impact your system’s performance.
| Issue | Description | Impact |
|---|---|---|
| Dirty Air Filters | Clogged filters restrict airflow | Reduced cooling efficiency |
| Refrigerant Leaks | Leaks cause refrigerant loss | System unable to cool |
| Thermostat Malfunctions | Incorrect temperature reading | Inconsistent cooling |
Diagnostic Approach
To diagnose the issue, start by checking the thermostat settings and ensuring it’s set to cooling mode. Then, inspect the air filters and condenser unit for dirt or blockages. If these initial checks don’t reveal the problem, it may be necessary to inspect the refrigerant levels, electrical connections, and ductwork for any issues.
Issue #1: Dirty or Clogged Air Filters
Dirty or clogged air filters can significantly impede your HVAC system’s ability to cool your home effectively. When air filters become clogged with dust, dirt, and debris, they restrict the airflow that your system needs to function properly.
How Restricted Airflow Affects Cooling
Restricted airflow due to dirty or clogged filters forces your HVAC system to work harder, leading to increased energy consumption and potentially causing the system to overheat or fail to cool your home adequately. This not only affects your comfort but also increases your energy bills.
Identifying a Clogged Filter
To identify if your air filter is clogged, inspect it visually for dust and dirt accumulation. A dirty filter will typically appear gray or black and may have visible debris. You can also check the filter’s airflow by holding it up to a light source; if light can’t pass through, it’s time for a replacement.
Step-by-Step Filter Replacement Guide
Replacing your air filter is a straightforward process:
- Turn off your HVAC system to prevent any debris from circulating.
- Locate the filter housing, usually found in the return air duct or near the air handler.
- Open the housing and gently pull out the old filter.
- Inspect the housing for dust and clean it if necessary.
- Insert the new filter, ensuring it’s properly seated and the airflow arrows point in the correct direction.
- Close the housing and turn your HVAC system back on.
Optimal Replacement Schedule
It’s recommended to replace your air filters every 1-3 months, depending on usage and the manufacturer’s guidelines. Regular replacement can improve your HVAC’s efficiency and prolong its lifespan. During peak usage seasons, consider checking your filters monthly to ensure they remain clean and unclogged.
Issue #2: Refrigerant Leaks or Low Levels
Refrigerant leaks or low levels can significantly impact your HVAC system’s ability to cool your home effectively. When refrigerant escapes or is depleted, the system’s capacity to transfer heat is compromised.
Recognizing Refrigerant Problems
Identifying refrigerant issues early can help prevent further damage to your HVAC system. There are specific signs to look out for:
Hissing Sounds
A hissing sound near your HVAC unit could indicate a refrigerant leak. This sound is caused by the refrigerant escaping under pressure.
Ice Formation on Refrigerant Lines
Ice forming on the refrigerant lines is another sign of a potential leak or low refrigerant levels. This occurs because the refrigerant is not absorbing heat properly, causing the lines to become excessively cold.
Environmental and System Impact
Refrigerant leaks not only affect your HVAC system’s performance but also have environmental implications. Many refrigerants are harmful greenhouse gases, and leaks can contribute to climate change. Moreover, running your system with low refrigerant can cause the compressor to work harder, potentially leading to premature failure.
Professional Repair Process
Addressing refrigerant leaks or low levels requires professional expertise. Here’s what you can expect during the repair process:
| Step | Description |
|---|---|
| 1. Inspection | The technician will inspect your HVAC system to identify any refrigerant leaks or other issues. |
| 2. Leak Detection | Using specialized equipment, the technician will detect the source of any refrigerant leaks. |
| 3. Repair or Replacement | The technician will repair or replace the damaged components, recharge the refrigerant to the recommended levels, and ensure the system is functioning correctly. |
It’s crucial to address refrigerant issues promptly to maintain your HVAC system’s efficiency and minimize environmental harm.
Issue #3: Thermostat Malfunctions
A malfunctioning thermostat can significantly impact your HVAC system’s ability to cool your home effectively. When the thermostat fails to function correctly, it can lead to inconsistent temperatures, increased energy bills, and reduced system lifespan.
Verifying Proper Thermostat Settings
The first step in troubleshooting thermostat issues is to verify that it’s set correctly. Ensure it’s set to “cool” mode and the temperature is set low enough to activate the cooling system. Also, check if the thermostat is in “hold” or “override” mode, which might prevent it from functioning as expected.
Battery Replacement Procedure
If your thermostat is battery-powered, dead or weak batteries could be the culprit. Replacing batteries is a simple process: remove the thermostat cover, take out the old batteries, and insert new ones, making sure to follow the correct polarity.
Calibration and Placement Issues
Improper calibration or placement of the thermostat can also cause issues. Ensure it’s level and away from direct sunlight, drafts, or heat sources. If you suspect calibration issues, consult your thermostat’s manual or contact a professional.
Smart Thermostat Troubleshooting Steps
For smart thermostats, troubleshooting involves checking the Wi-Fi connection, ensuring the device is properly configured through its app, and updating the firmware if necessary. Restarting the thermostat or performing a factory reset can also resolve many issues.
By addressing these common thermostat malfunctions, you can often restore your HVAC system’s cooling functionality. However, if problems persist, it may be time to consult a professional HVAC technician.
Issue #4: Dirty or Blocked Condenser Unit
One often overlooked cause of HVAC cooling problems is a dirty or obstructed condenser unit. The condenser unit is a critical component of your HVAC system, responsible for dissipating heat from the refrigerant to the outside air.
Importance of Condenser Airflow
Proper airflow around the condenser unit is essential for efficient cooling. When the unit is clogged with debris or dirt, it restricts airflow, causing the system to work harder and potentially leading to increased energy bills and reduced system lifespan.
Condenser airflow is crucial because it allows the system to dissipate heat effectively. Without proper airflow, the system’s ability to cool is compromised.
Safe Cleaning Procedures
Cleaning the condenser unit is a relatively straightforward process, but it requires caution. Before starting, ensure the power to the unit is turned off at the circuit breaker or fuse box.
Removing Debris and Vegetation
Begin by clearing any debris, leaves, or vegetation around the condenser unit. Use a garden hose to gently remove dirt and dust from the fins and coils. Be careful not to bend the fins, as this can further restrict airflow.
Washing Condenser Fins
For more thorough cleaning, use a fin comb or a soft-bristled brush to gently clean between the fins. You can also use a specialized coil cleaning solution, following the manufacturer’s instructions.
Maintaining Proper Clearance Around Unit
To ensure optimal performance, maintain at least 12 inches of clearance around the condenser unit. Regularly inspect the area around the unit and trim any vegetation that may obstruct airflow.
By keeping your condenser unit clean and maintaining proper clearance, you can help ensure your HVAC system operates efficiently and effectively.
Issue #5: Frozen Evaporator Coils
Frozen evaporator coils are a frequent culprit behind HVAC systems that are not cooling properly, making it essential to understand the causes and solutions.
Common Causes of Coil Freezing
There are several reasons why evaporator coils might freeze. Understanding these causes is crucial for effective troubleshooting and repair.
Airflow Restrictions
One of the primary causes of frozen evaporator coils is restricted airflow. When airflow is limited, the coils can’t absorb heat properly, leading to freezing temperatures.
Refrigerant Issues
Refrigerant leaks or improper charging can also cause the evaporator coils to freeze. If the refrigerant level is too low, the pressure drops, causing the temperature to decrease to freezing levels.
Safe Thawing Methods
If you discover that your evaporator coils are frozen, it’s crucial to thaw them safely to avoid damaging your HVAC system.
- Turn off the HVAC system to prevent further damage.
- Check for and address any airflow restrictions.
- Use a gentle heat source or let the coils thaw naturally.
As noted by HVAC experts, “Allowing the system to thaw naturally is often the safest method, although it may take longer.”
“The best approach is to prevent the coils from freezing in the first place by maintaining proper airflow and refrigerant levels.”
– HVAC Technician Insights
Preventing Future Freeze-ups
Prevention is key when it comes to frozen evaporator coils. Regular maintenance can help identify potential issues before they lead to coil freezing.
| Maintenance Task | Frequency | Benefit |
|---|---|---|
| Air Filter Replacement | Every 1-3 months | Ensures proper airflow, reducing the risk of coil freezing. |
| Refrigerant Level Check | Annually | Prevents low refrigerant levels that can cause coil freezing. |
| Coil Cleaning | Annually | Removes dirt and debris that can cause airflow restrictions. |
By understanding the causes of frozen evaporator coils and taking proactive steps, you can prevent this issue and ensure your HVAC system operates efficiently.
Issue #6: Electrical Problems
Electrical issues can significantly impact your HVAC system’s performance, leading to cooling problems. Understanding and addressing these electrical malfunctions is crucial for restoring your system’s functionality.
Checking Circuit Breakers and Fuses
The first step in diagnosing electrical problems is to check your circuit breakers and fuses. A tripped breaker or blown fuse can disrupt power to your HVAC system. Ensure that your breakers are in the “on” position and replace any blown fuses. Regularly inspect these components to prevent unexpected system shutdowns.
Capacitor and Contactor Issues
Capacitors and contactors are critical electrical components. A faulty capacitor can prevent your compressor and fan from operating, while a malfunctioning contactor can disrupt the electrical supply. Inspect these components for signs of wear or damage, and replace them if necessary.

Wiring Problems and Disconnects
Wiring issues, such as frayed or disconnected wires, can cause significant electrical problems. Inspect your HVAC system’s wiring for any damage or disconnections. Ensure all connections are secure and repair or replace damaged wiring.
Electrical Safety Precautions
When dealing with electrical issues, safety is paramount. Always turn off the power to your HVAC system before inspecting or repairing electrical components. Use appropriate safety gear, such as insulated gloves and safety glasses, to protect yourself from electrical shock.
| Electrical Component | Common Issues | Solution |
|---|---|---|
| Circuit Breakers | Tripped breakers | Reset or replace |
| Fuses | Blown fuses | Replace with correct rating |
| Capacitors | Failure to hold charge | Replace with matching specs |
By systematically checking and addressing these electrical components, you can identify and fix the root cause of your HVAC system’s cooling issues, ensuring a safe and efficient operation.
Issue #7: Ductwork Problems
The condition and design of your ductwork play a crucial role in determining the effectiveness of your HVAC system’s cooling. Ductwork problems can lead to significant inefficiencies and increased energy bills.
Detecting Leaky Ducts
Leaky ducts are a common issue that can cause your HVAC system to work harder than necessary. To detect leaks, inspect your ducts for any visible gaps or holes. You can also perform a simple test by turning on your HVAC system and holding a lit candle or incense stick near the suspected leak area. If the flame flickers or the smoke is drawn towards the duct, you’ve found a leak.
Addressing Blocked or Closed Vents
Blocked or closed vents can significantly reduce airflow, causing uneven cooling throughout your home. Ensure that all vents are open and not obstructed by furniture or other objects. Regularly cleaning the vents can also help maintain optimal airflow.
Improper Duct Sizing and Airflow
Improper duct sizing can lead to reduced system efficiency and increased energy costs. If your ducts are too small, they can cause the system to work harder, leading to potential overheating and reduced lifespan.
| Duct Sizing Issue | Impact on HVAC | Solution |
|---|---|---|
| Too Small | Increased pressure, potential overheating | Upgrade to larger ducts |
| Too Large | Reduced airflow, increased energy costs | Adjust or replace with appropriately sized ducts |
DIY vs. Professional Duct Sealing
While DIY duct sealing can be a cost-effective solution for minor leaks, professional duct sealing is recommended for more extensive or complex issues. Professionals have the necessary equipment and expertise to ensure a thorough and lasting seal.
“Proper duct sealing can improve your HVAC system’s efficiency by up to 20%.” – HVAC Expert
In conclusion, addressing ductwork problems is crucial for maintaining an efficient HVAC system. By detecting and fixing leaks, ensuring vents are open, and sizing ducts correctly, you can significantly improve your system’s performance.
When to Call an HVAC Professional
Not all HVAC problems can be solved with DIY fixes; knowing when to call in a professional is crucial. While troubleshooting can resolve some issues, complex problems require expert intervention.
Problems Beyond DIY Solutions
If you’ve tried basic troubleshooting and your HVAC system still isn’t cooling properly, it’s likely time to call a professional. Issues like refrigerant leaks, electrical problems, or complex thermostat malfunctions often require specialized tools and expertise.
Finding a Qualified Technician
To find a qualified HVAC technician, start by asking for referrals from friends, family, or neighbors. Check online reviews and verify licenses with your state’s licensing board. Ensure they have experience with your specific HVAC system brand.
Questions to Ask Before Hiring
Before hiring an HVAC professional, ask about their experience, pricing, and warranty policies. Here are some key questions to consider:
| Question | Why It Matters |
|---|---|
| What experience do you have with my HVAC system brand? | Ensures they’re familiar with your system. |
| Can you provide references? | Helps verify their credibility and work quality. |
| What’s your pricing structure? | Helps you understand the cost and avoid surprises. |
What to Expect During a Service Call
During a service call, the technician will diagnose the issue, explain the necessary repairs, and provide a quote. They’ll then perform the repairs, test the system to ensure it’s working correctly, and offer advice on maintenance to prevent future issues.
By understanding when to call a professional and what to expect, you can ensure your HVAC system is repaired efficiently and effectively.
Preventive Maintenance to Avoid Cooling Issues
To avoid the discomfort and expense of a malfunctioning HVAC, preventive maintenance is key. Regular maintenance not only ensures your system operates efficiently but also prolongs its lifespan.
Monthly Homeowner Maintenance Tasks
Homeowners can perform several tasks monthly to keep their HVAC system in good condition. These include:
- Checking and replacing air filters as needed
- Ensuring vents are not blocked by furniture or curtains
- Inspecting the outdoor unit for debris and cleaning it if necessary
Seasonal Maintenance Checklist
In addition to monthly tasks, there are seasonal checks that can help prevent cooling issues. These include:
| Season | Task |
|---|---|
| Spring | Inspect and clean condenser coils |
| Summer | Check thermostat settings and calibrate if necessary |
| Fall | Inspect ductwork for leaks or damage |
| Winter | Check for proper insulation around ducts |
Benefits of Professional Tune-ups
While homeowners can perform many maintenance tasks, professional tune-ups offer additional benefits. These include:
- Detailed inspection of system components
- Cleaning and adjusting parts for optimal performance
- Identifying potential issues before they become major problems
Extending Your HVAC System’s Lifespan
Regular maintenance, including both homeowner tasks and professional tune-ups, can significantly extend the lifespan of your HVAC system. By ensuring that your system operates efficiently, you can avoid premature wear and tear, reducing the need for costly repairs or replacements.

Conclusion
Understanding the common causes of HVAC cooling failures is crucial for effective troubleshooting and resolving cooling issues. By identifying and addressing problems such as dirty air filters, refrigerant leaks, thermostat malfunctions, and ductwork issues, you can restore your system’s cooling efficiency. Regular maintenance, including filter replacements and professional tune-ups, can help prevent future cooling problems and extend the lifespan of your HVAC system.
With the knowledge gained from this article, you’re now better equipped to diagnose and potentially fix your HVAC system’s cooling issues. Whether it’s a simple filter replacement or a more complex problem requiring professional attention, taking action can help you stay cool and comfortable during the warmest months. Effective HVAC troubleshooting conclusion leads to successful cooling issues resolution, ensuring your home remains a comfortable haven.
FAQ
What are the common signs that my HVAC system is not cooling properly?
Common signs include warm air coming from vents, inconsistent temperatures throughout your home, the system running constantly without cooling, and unusual sounds or odors.
How often should I replace my air filters to ensure optimal HVAC performance?
The frequency of replacing air filters depends on various factors, including usage, manufacturer recommendations, and environmental conditions. Typically, filters should be replaced every 1-3 months.
Can I fix refrigerant leaks or low levels in my HVAC system myself?
No, refrigerant leaks or low levels require professional attention. Handling refrigerants involves specific safety protocols and regulations, and improper handling can lead to environmental hazards and system damage.
How can I troubleshoot thermostat issues with my HVAC system?
Start by verifying proper thermostat settings, checking battery levels if applicable, ensuring correct calibration, and assessing its placement. For smart thermostats, follow the manufacturer’s troubleshooting steps.
What maintenance tasks can I perform to prevent cooling issues with my HVAC system?
Monthly tasks include checking and replacing air filters, inspecting thermostat settings, and ensuring proper clearance around the condenser unit. Seasonal tasks involve more in-depth checks and cleaning.
When should I call an HVAC professional for assistance?
Seek professional help when you encounter issues beyond simple DIY solutions, such as complex electrical problems, refrigerant leaks, or significant ductwork damage. Professionals can diagnose and fix problems efficiently.
What are the benefits of regular professional tune-ups for my HVAC system?
Regular tune-ups can improve system efficiency, extend its lifespan, reduce energy bills, and prevent sudden breakdowns. Professionals can identify and address potential issues before they become major problems.
How can I detect leaky ducts in my HVAC system?
Detecting leaky ducts involves inspecting duct connections, checking for signs of air leakage, and potentially using a duct leakage test. Leaky ducts can significantly reduce system efficiency and increase energy costs.
What are the risks of ignoring electrical problems in my HVAC system?
Ignoring electrical issues can lead to system failures, safety hazards, including the risk of electrical shock or fires, and potentially voiding your system’s warranty. Electrical problems should be addressed promptly by a professional.
How can I ensure my HVAC system is properly maintained to avoid cooling issues?
Regular maintenance involves a combination of monthly and seasonal tasks performed by homeowners, along with periodic professional tune-ups. This proactive approach helps prevent cooling issues, improves efficiency, and extends the system’s lifespan.


Good,Informative